對於 WordPress 資料庫結構有個大概的認識後,我們就能把後台的設定選項歸納為兩種,一種是放在 wp_options 的全域設定,另外一種是放在 wp_{xxx}meta 裡面的局部設定。在這個金流外掛之中我們會做到以下兩種設定欄位:
- 金流商的商店代號、金鑰以及除錯設定
- 訂單紀錄交易回傳結果
第一個種欄位是全域設定,所以我們會把他寫在 wp_options 裡面,第二種是局部設定,寫在 wp_postmeta 裡面。這篇文章我們先來處理全域設定的部分。
如果我們要做的設定選項無法關聯到 post、user 或是其他資料欄位的話,放在全域設定會是比較好的選擇,像是網站的標題、描述、語系、時區這些跟網站本身有關的項目,或是我們自行開發的外掛需要提供一些設定功能時,就會放在 wp_options 裡面。
WordPress 的 Settings API 提供了豐富的函式可以來新增後台選單以及設定項的表單欄位,如果我們要製作設定頁面完全不用寫到半行 HTML 跟處理表單 POST 的問題,WordPress 全都幫我們封裝好了,而 WooCommerce 的設定 API 跟 WordPress 不同,它另外寫了一支抽象類別 WC_Settings_Page 來讓我們繼承使用。
由於我們是要開發 WooCommerce 金流外掛為主,所以本篇會用 WooCommerce 的 Settings API 來做說明。先讓我們回顧一下目前鐵人付外掛的資料夾結構:
iron-pay
├── composer.json
├── composer.lock
├── iron-pay.php
├── src
└── vendor
    ├── a7
    ├── autoload.php
    └── composer
將目錄切換到 src 資料夾,並且新增 Options.php:
~/Sites/woocommerce/wp-content/plugins/iron-pay$ cd src
~/Sites/woocommerce/wp-content/plugins/iron-pay$ touch Options.php
關於檔案的命名方式,在 WordPress Coding Standard 的建議是採用 class-xxx.php 這樣的形式,但由於之後會提到測試 PHPUnit 的部分,為了要遵循 PSR-4 的自動載入機制,使用駝峰再搭配命名空間的寫法會比較方便後續的作業,取名為 Options 是為了要跟資料表做呼應,代表這個檔案負責處理的是全域設定的相關功能。
WooCommerce 設定頁的基本邏輯如下:
/**
 * Add setting page
 *
 * @param array $settings settings.
 */
class IronPay_Setting extends WC_Settings_Page {
    //...
}
function add_setting_page( $settings ) {
    $settings[] = new IronPay_Setting();
    return $settings;
}
add_filter( 'woocommerce_get_settings_pages', 'add_setting_page' );
它是透過一個 Filter 勾點來修改既有的 \$settings 陣列,而回呼函式 add_setting_page 要處理的就是增加 $settings 的值後返回它。而新增 $settings 的值是要繼承抽象類別 WC_Settings_Page 並返回實例,接下來開啟 Opitons.php 貼上以下程式碼:
<?php

namespace Irp;

function set_options() {
    class Options extends \WC_Settings_Page {
        // 設定項實作
    }

    return new Options();
}

add_filter( 'woocommerce_get_settings_pages', 'irp\set_options' );
首先,為了可以大量減少在類別或是函式名稱增加前綴來避免衝突的做法,以及方便程式碼重用,我們改用命名空間的作法來進行辨識,這樣如果要用在其他專案只要修改命名空間就好,不然沒有前綴像 set_options 或是 Options 這種菜市場名一定每天都會噴錯。因為使用了命名空間,所以在需要繼承的類別以及函式要注意到路徑問題。
其次,為了方便管理,我把繼承類別放在函式之中,最後再透過 woocommerce_get_settings_pages 勾點去執行它,之後如果要新增相關的設定欄位,都可以在 Options 這個檔案中一併處理。接下來是 Options 類別的實作細節,包含建構式在內一共有七個方法,我們逐一來看:
class Options extends \WC_Settings_Page {
    public function __construct() {
        $this->id = 'irp_setting_gateway';
        add_filter( 'woocommerce_settings_tabs_array', array( $this, 'add_settings_tab' ), 51 );
        add_action( 'woocommerce_settings_' . $this->id, array( $this, 'output' ) );
        add_action( 'woocommerce_settings_save_' . $this->id, array( $this, 'save' ) );
    }
在建構式中首先設定了父類別的 ID 屬性,這代表這組全域設定的代稱,後面設定了三個勾點,分別是管理 WooCommerce 設定頁籤、輸出設定欄位、儲存設定欄位三個功能,第一個方法 add_settgins_tab 增加設定頁籤:
/**
* Add a new settings tab to the WooCommerce settings tabs array.
*
* @param array $settings_tabs setting tab.
* @return array $settings_tabs setting tab.
*/
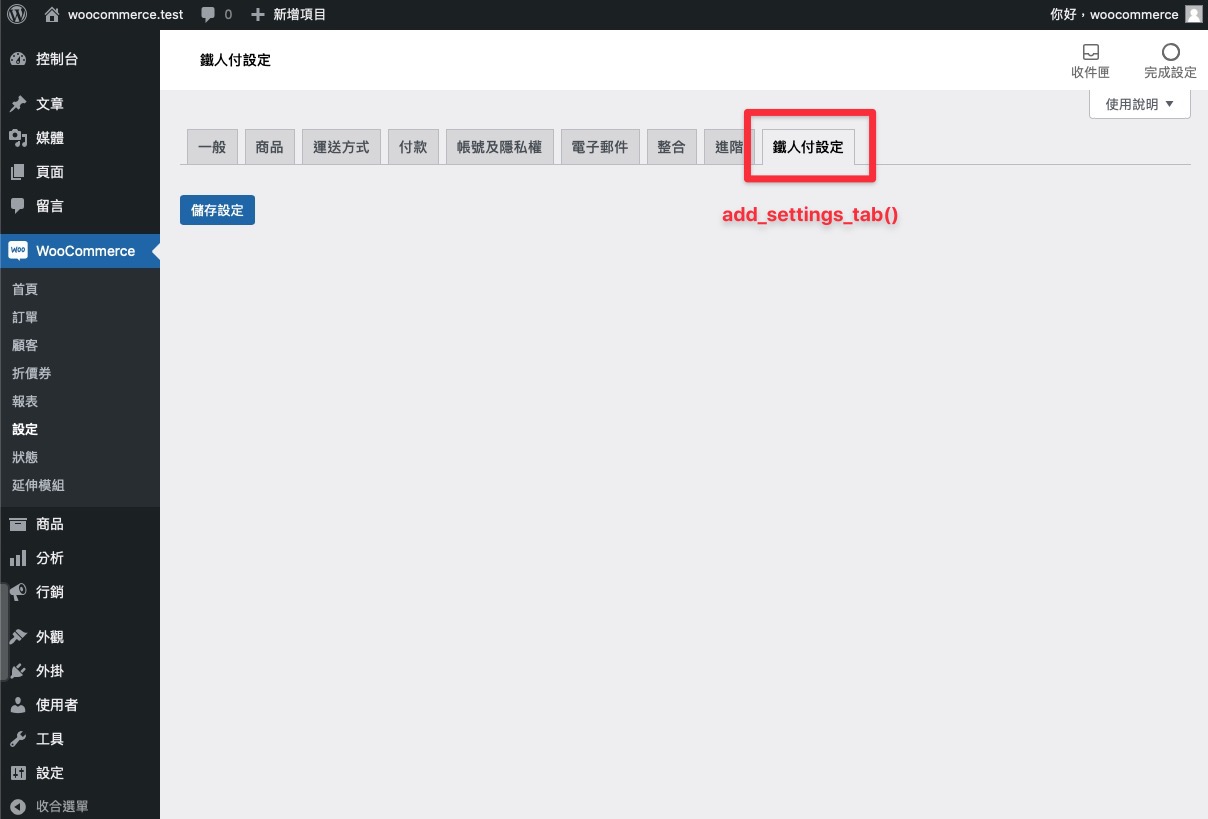
public function add_settings_tab( $settings_tabs ) {
$settings_tabs['irp_setting_gateway'] = '鐵人付設定';
return $settings_tabs;
}
第二個 output 方法為渲染表單欄位:
/**
 * Render fields html.
 */
public function output() {
    global $current_section;
    $settings = $this->set_fields( $current_section );
    \WC_Admin_Settings::output_fields( $settings );
}
先用 WooCommerce 的 $current_section 來取得所在設定頁的 ID,然後傳入稍後會實作的 set_fields 方法,最後使用 WC_Admin_Settings 的靜態方法把欄位顯示在設定頁。
第三個 save 方法為儲存表單資料:
/**
 * Save fields value.
 */
public function save() {
    global $current_section;
    $settings = $this->set_fields( $current_section );
    \WC_Admin_Settings::save_fields( $settings );
}
邏輯跟 output 相似,透過 save_fields 可以直接把欄位都寫進資料庫,無需再手動處理,最後最重要的是來新增設定欄位,也就是 set_fields 方法的實作:
/**
* Get all the settings for this plugin for @see woocommerce_admin_fields() function.
*
* @return array Array of settings for @see woocommerce_admin_fields() function.
*/
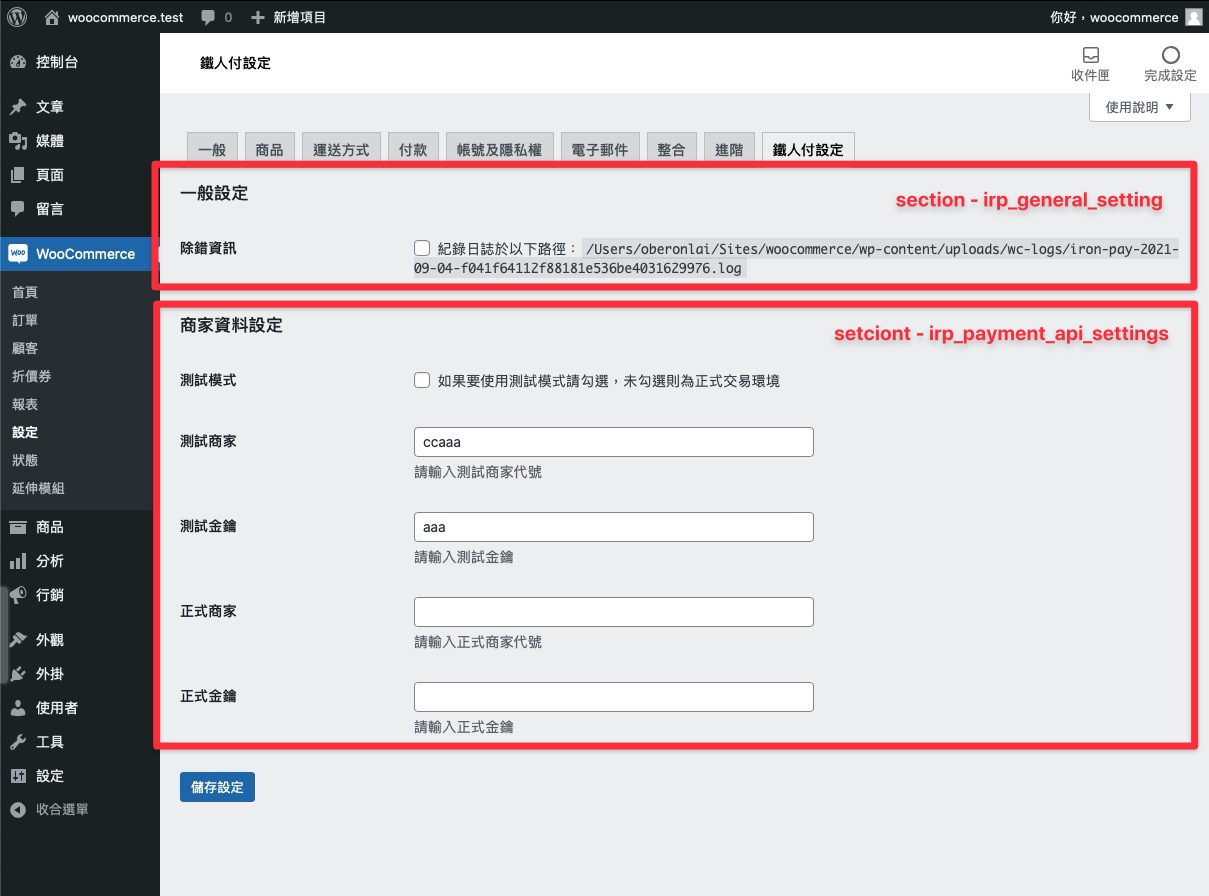
public function set_fields( $section = null ) {
$settings = array(
array(
'title' => '一般設定',
'type' => 'title',
'id' => 'irp_general_setting',
),
array(
'title' => '除錯資訊',
'type' => 'checkbox',
'default' => 'no',
'desc' => sprintf( '紀錄日誌於以下路徑:<code>%s</code>', wc_get_log_file_path( 'iron-pay' ) ),
'id' => 'irp_payment_debug_log_enabled',
),
array(
'type' => 'sectionend',
'id' => 'irp_general_setting',
),
array(
'title' => '商家資料設定',
'type' => 'title',
'id' => 'irp_payment_api_settings',
),
array(
'title' => '測試模式',
'type' => 'checkbox',
'desc' => '如果要使用測試模式請勾選,未勾選則為正式交易環境',
'id' => 'irp_payment_testmode_enabled',
),
array(
'title' => '測試商家',
'type' => 'text',
'desc' => '請輸入測試商家代號',
'id' => 'irp_payment_testmode_orgno',
),
array(
'title' => '測試金鑰',
'type' => 'text',
'desc' => '請輸入測試金鑰',
'id' => 'irp_payment_testmode_secret',
),
array(
'title' => '正式商家',
'type' => 'text',
'desc' => '請輸入正式商家代號',
'id' => 'irp_payment_orgno',
),
array(
'title' => '正式金鑰',
'type' => 'text',
'desc' => '請輸入正式金鑰',
'id' => 'irp_payment_secret',
),
array(
'type' => 'sectionend',
'id' => 'irp_payment_api_settings',
),
);
return $settings;
}可以看到裡面就是使用陣列來定義欄位的類型與名稱,比較特別的是 type 為 sectionend 的陣列,它會對應到相同的 ID 來作為一個段落的區分,像是第一個 sectionend 對到的是 irp_general_setting 因此一般設定裡面的除錯資訊是一個區塊。
欄位的參數說明如下:
array(
     'title' => '欄位顯示名稱',
     'description' => '欄位描述',
     'type' => 'text|password|textarea|checkbox|select|multiselect',
     'default' => '預設值',
     'class' => 'CSS 類別',
     'css' => '行內樣式',
     'label' => '選項標籤', // 限於 checkbox
     'options' => array(  // select/multiselects 選項
          'key' => 'value'
     )
)
透過這樣的方式來設計欄位好處是非常方便,再加上樣式也會符合整體風格,以及內建過濾敏感字串,這要自己刻的話會花上不少時間。但如果想要設計自己的設定頁面也是完全可行的,不管是使用 WordPress Settings API 還是專門建立 custom fields 的外掛都可實現,但站在使用者角度來看,提供給 WooCommerce 的功能做在其設定頁面裡面會比較符合操作的邏輯性。
最後完成後的 Options.php 如下:
<?php

namespace Irp;

function set_options() {
    class Options extends \WC_Settings_Page {

        public function __construct() {
            $this->id = 'irp_setting_gateway';
            add_filter( 'woocommerce_settings_tabs_array', array( $this, 'add_settings_tab' ), 51 );
            add_action( 'woocommerce_settings_' . $this->id, array( $this, 'output' ) );
            add_action( 'woocommerce_settings_save_' . $this->id, array( $this, 'save' ) );
        }

        /**
         * Add a new settings tab to the WooCommerce settings tabs array.
         *
         * @param array $settings_tabs setting tab.
         * @return array $settings_tabs setting tab.
         */
        public function add_settings_tab( $settings_tabs ) {
            $settings_tabs['irp_setting_gateway'] = '鐵人付設定';
            return $settings_tabs;
        }

        /**
         * Get all the settings for this plugin for @see woocommerce_admin_fields() function.
         *
         * @return array Array of settings for @see woocommerce_admin_fields() function.
         */
        public function set_fields( $section = null ) {
            $settings = array(
                array(
                    'title' => '一般設定',
                    'type'  => 'title',
                    'id'    => 'irp_general_setting',
                ),
                array(
                    'title'   => '除錯資訊',
                    'type'    => 'checkbox',
                    'default' => 'no',
                    'desc'    => sprintf( '紀錄日誌於以下路徑:<code>%s</code>', wc_get_log_file_path( 'iron-pay' ) ),
                    'id'      => 'irp_payment_debug_log_enabled',
                ),
                array(
                    'type' => 'sectionend',
                    'id'   => 'irp_general_setting',
                ),
                array(
                    'title' => '商家資料設定',
                    'type'  => 'title',
                    'id'    => 'irp_payment_api_settings',
                ),
                array(
                    'title' => '測試模式',
                    'type'  => 'checkbox',
                    'desc'  => '如果要使用測試模式請勾選,未勾選則為正式交易環境',
                    'id'    => 'irp_payment_testmode_enabled',
                ),
                array(
                    'title' => '測試商家',
                    'type'  => 'text',
                    'desc'  => '請輸入測試商家代號',
                    'id'    => 'irp_payment_testmode_orgno',
                ),
                array(
                    'title' => '測試金鑰',
                    'type'  => 'text',
                    'desc'  => '請輸入測試金鑰',
                    'id'    => 'irp_payment_testmode_secret',
                ),
                array(
                    'title' => '正式商家',
                    'type'  => 'text',
                    'desc'  => '請輸入正式商家代號',
                    'id'    => 'irp_payment_orgno',
                ),
                array(
                    'title' => '正式金鑰',
                    'type'  => 'text',
                    'desc'  => '請輸入正式金鑰',
                    'id'    => 'irp_payment_secret',
                ),
                array(
                    'type' => 'sectionend',
                    'id'   => 'irp_payment_api_settings',
                ),
            );
            return $settings;
        }

        /**
         * Render fields html.
         */
        public function output() {
            global $current_section, $hide_save_button;
            $settings = $this->set_fields( $current_section );
            \WC_Admin_Settings::output_fields( $settings );
        }

        /**
         * Save fields value.
         */
        public function save() {
            global $current_section;
            $settings = $this->set_fields( $current_section );
            \WC_Admin_Settings::save_fields( $settings );
        }

    }

    return new Options();
}

add_filter( 'woocommerce_get_settings_pages', 'irp\set_options' );
要提供哪些設定欄位要根據串接金流商以及客戶的需求而定,完成全域設定之後接下要處理的是訂單以及使用者欄位,下一篇會介紹該如何新增自訂欄位 metabox。